Spyder CNC software overview
 |
| -Click to Go Back |
Spyder CNC Machine comes with the Spyder CNC software. The process is very straightforward with Spyder CNC software. Import your design file using a USB memory stick, choose your file from the File tab, and load it to the machine. You will see the part design in the perspective view.
There is NO subscription fee for the software. Do not worry about the system requirements because the software is already installed on the PC that comes with the Spyder CNC machine. Finally, the Spyder CNC software does not require an internet connection to operate. It runs with G-code (.gcode) files.
User Interface
The software has a layout structure that makes CNC milling much easier.

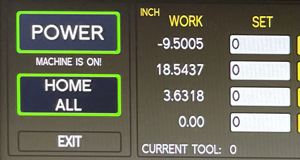
Power and Homing Window
Click here for Power Up and Keyboard Setup
Homing
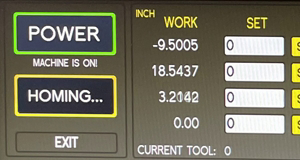
Click on the blinking Press To POWER and then click on the blinking Home All buttons
| - |  | - |  | - |
It will be blinking in Yellow during the homing. In the end, it will show as Homed.
| - |  | - | 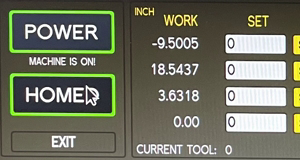 | - |
When using the EXIT button, the machine will save the G54 coordinates homing positions based on your workpiece.
When you are done using the machine, you can unplug the power cord from the wall outlet if you do not need to keep the homing coordinates.
Work Offsets Window

This window is used to define the work coordinates. They are also called G54 work offsets. That defines the work coordinates for the g-codes. You can either type these desired coordinates and hit enter or click on the SET buttons for each axis. Default settings are always zero. These controls are not available while the machine is running on g-code.
DTG (Distance to Go) – DTG or Distance to Go labels that are read-only and display the distance remaining in any single move.
It also shows the current tool number and current velocity in IPM.
Spindle, Jog and Mist Control Window

Mist Control
Click the MIST ON button to turn on air and mist (air and mist are now active). Control mist amount by clicking/dragging the Mist Amount tab. To run the air without mist, click the MIST ON button and drag the Mist Amount tab to the left below 0.45. Any value above 0.45 will activate and increase the mist amount.
For cutting plastics, wood, or other materials, shut off the mist and use only air—route mist line and filter into the bottom of the solution container from its cap. Place mist container in a safe location away from the machine when operating. The container has a sealed lid to keep the solution clean.
Spindle Control
Click the SPINDLE ON button to turn on the spindle in manual control. It is a similar move as to M04 and M05. Next, control the RPM by clicking/dragging the Spindle RPM tab. RPM range is between 2000 and 20000 rpm.
Note: APSX-SPYDER spindle only rotates clockwise.
Jogging Control
Keyboard – Jogging Controls
Step Mode: Mill jogs in steps. Step size is controlled by the buttons available.
Continuous Mode: Mill jogs at a continuous speed when you press the keyboard.
[ < ] or [ > ] - Reduce or increase jog speed. You can also manually adjust the jog speed from the speed bar on the screen.
[R] - Run Cycle button - begin running G-Code file.
[P] - Pause button - pause G-Code file. After pausing, resume running with [S]- Resume button.
[Esc] – Abort button - exits G-Code file completely, shuts off the flood, and shuts off spindle (User cannot resume running).
[→]- Positive travel on X-Axis.
[←] - Negative travel on X-Axis.
[ ↑ ] - Positive travel on Y-Axis.
[ ↓ ] - Negative travel on Y-Axis.
[PgUp] -Positive travel on Z-Axis.
[PgDn] - Negative travel on Z-Axis.
Pendant - Jogging

The pendant allows precise control of the machine's travel speed. For example, manually touching off the end mill to your workpiece and zeroing the X, Y and Z-axis requires small adjustments at low speed. It increases efficiency on the jobs that require a difficult setting of the workpiece and the tool.
PRESS AND HOLD X, Y, or Z buttons and rotate the Controller Ring clockwise for positive continuous travel, rotate counterclockwise for negative travel.
Step jogging is done with the Jog Wheel for jogging in very small increments by pressing and holding the X, Y, or Z buttons. You need to use the button "A" for the 4th axis jogging.
Cycle Control Window
These controls are available to use while running a g-code program.

Run Cycle
It starts the program. While it is ON, the green light around the button illuminates.
Abort
It exits the program and stops all motion including the spindle.
Run From Here
Click on the FIND button to open the dialog box. Type the keyword that you want to find in the g-code. It will highlight the keyword(s) in the g-code for you. When you click on it, you can use the Run From Here button to run the program starting from that line.
Step
It executes the g-code one line at a time. You need to click on PAUSE button first then click on STEP button each time. Go cancel this mode, click on RESUME button.
Pause
It pauses the g-code. If you click on the RESUME button, it will continue.
Feed Override Limit
Changes the IPM (inches per minute) defined in the G-Code by the percentage selected on the slider. This will affect G01 (feed) codes not on G00 rapid moves.
Spindle RPM Override Limit
Changes the spindle RPM defined in the G-Code by the percentage selected on the slider. This will affect G01 (feed) codes not on G00 rapid moves. The spindle must be running for these controls to have a noticeable effect. The override doesn’t drive the spindle past its maximum speed.
Max Velocity
Adjustable maximum speed for any move (G01 and G00). The slider can be very useful when running a G-code program for the first time. You can use it to stop the mill by sliding it down to 0 and verifying the Distance to Go and X/Y/Z/A DROs look appropriate before continuing.
The Last Row Number Stopped, Status and the Cycle Time
The last row number stopped shows the number when the program is aborted or paused. The status shows the current status of the machine such as idle or running. The last number on the right corner show the cycle time.
G-Code and MDI Window

Recent Files Drop-Down Menu
It displays the currently loaded g-code file. When you click on it, you can see the last files that have been loaded.
MDI Line
You can send commands to the machine directly by typing a command into this Manual Data Input line (MDI) window. Then you need to press ENTER to execute. You can press the ESC to abandon it. Recent commands are stored for reuse.
Find
You can search text in the g-code file for numbers, codes, or speeds etc. Click on the FIND button to open the popup window. Type the keyword to search and click on the find button there. If you select the check box, the findings will be highlighted.